
Vue on Django, Part 2
1250 words. Time to Read: About 12 minutes.This is Part 2 of my tutorial for making a Vue app powered by a Django REST backend. In the first part, we set up just the Vue side. Part 2 will be the hardest part, setting up the data model. Finally, part 3 – next time – will be the Django backend. The tutorial will assume a working knowledge of JavaScript syntax, but I’ll try to explain some of the infrastructure involved. Once again, let’s get to it.
1. Introducing Vuex
Vuex is the “back of the frontend” that we’ll be using to interface with (eventually) the REST backend. The nice thing about setting this up is that we can tie all of the front-end components into our data-store and point the data-store nowhere. With that in place, the store will operate only on what is in-memory. But once we’re good and ready to point it at our django server, all we have to do is adjust a little bit and we don’t have to change actions all over the front end. Once hooked up, Vuex will help us appear to be doing things super-fast, when we are, in reality, possibly sending a slow network call to update the database. It will take care of that overhead in the background, leaving the user to wreak havoc on the todo list in the meantime.
In order to get started, all we’ll need is what you had after Part 1 – and to install Vuex.
$ npm install --save vuex
2. Creating the Store
Create a folder src/store/ and create store.js inside that folder. Vuex Stores are made of up a few modular parts, similar to the way Vue components are. For this app, we’ll only use three of these: the state, the mutations, and the actions. The following shows their relationship to the rest of our app.
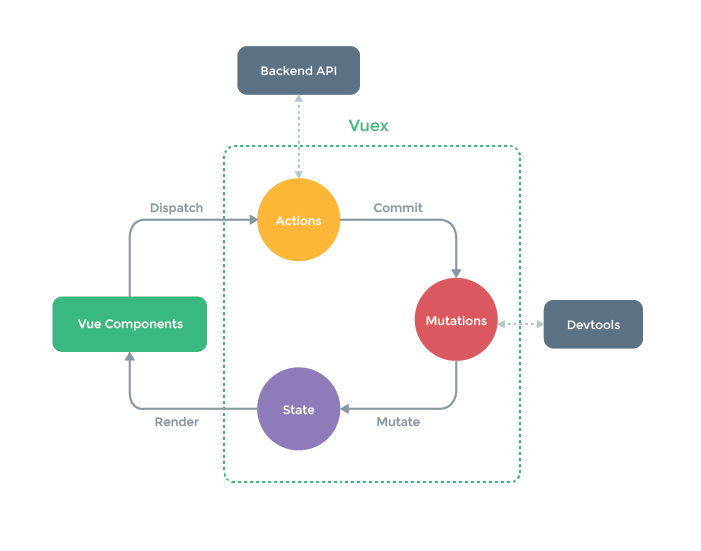
State represents the state of your data. What is the current value of todos? Your components can read from this state directly (or through getters if there is some processing to be done. We won’t cover that now), but in order to write to it, they need to go through actions. A component can dispatch an action, and actions can be as asynchronus as you like. Once the action has completed all side-effects, like hitting the database, it can commit a mutation. A mutation is a synchronus change to the Vuex state, and they must be synchronus. Get it? Actions: asynchronus. Mutations: the last step of the action, totally synchronus. Anyways, too much theory. Boo theory. More code! Here are the contents of store.js.
// store.js

import Vue from 'vue'
import Vuex from 'vuex'

Vue.use(Vuex) // only required if you're using modules.
              // We're using modules, so there you go.

const store = new Vuex.Store({
  state: {
    todos: [
      { text: 'Learn Vue.' },
      { text: 'Do hard things.' }
    ]
  },
  mutations: {
    'ADD_TODO': function (state, todo) {
      state.todos.push(todo)
    },
    'CLEAR_TODOS': function (state) {
      const todos = state.todos
      todos.splice(0, todos.length)
    }
  },
  actions: {
    addTodo (store, todo) {
      store.commit('ADD_TODO', todo)
    },
    clearTodos (store) {
      store.commit('CLEAR_TODOS')
    }
  }
})

export default store
You can see most of the pieces we talked about above. Our actions could (and will) do more, but currently they just pass through and commit their respective mutations. You can see that if we had very many more mutations and/or actions, we would want to break them out into separate files: actions.js and mutations.js and import them separately. The mutations don’t have to be in all caps, either. You could declare them as in-place functions just like the actions (and even use the same names as the actions if you want). The tutorial I saw used SCREAMING_SNAKE case, and I kind of like it because it helps me tell the difference between the actions and the mutations. Do what you want, it’s your life.
3. Using the Store
OK! Now we need to make this delicious little store available to our app. Modify your main.js file to look like the following.
// main.js

import Vue from 'vue'

import App from './App'
import store from './store/store.js'

/* eslint-disable no-new */
new Vue({
  el: 'body',
  store: store,
  components: { App }
})
Now our store will be available from within the Components. The following is the new shiny TodoList.vue.
// src/components/TodoList.vue

<template>
  <div id="todolist">
    <ul>
      <todo v-for="todo in todos"
            v-bind:todo="todo"
            v-bind:key="todo.id">
      </todo>
    </ul>
  </div>
</template>

<script>
import Todo from './Todo.vue'

export default {
  components: {
    Todo
  },
  computed: {
    todos () {
      return this.$store.state.todos
    }
  }
}
</script>
You’ll notice that there was really only one change for the store. We changed the data key of the component to a computed section. That makes it so that our component will update as the outside data changes. Computed contains functions for each variable you reference. In our case that’s just todos. We reference the store object with $store and can read from it directly, like we talked about before. Please also notice that I tweaked the template as well to make it work better. I took out the li element and placed the v-for directly within the todo. I’m not sure, but I kind of think it wouldn’t have worked the way we had it previously. Whoopsie. That’s all the changes here. Next is Todo.vue.
// src/components/Todo.vue

<template>
  <li>
    {{ todo.text }}
  </li>
</template>

<script>
export default {
  props: ['todo']
}
</script>
As you can see, the only change was fixing my previous booboo, and placing the li element that we took out of TodoList.vue into here, replacing the p tags. It’s also slightly more intuitive, I think. Moving on to the UserInput.vue.
// src/components/UserInput.vue

<template>
  <div id="user-inputs">
    <input v-model="newTodoText" v-on:keyup.enter="createTodo">
    <button v-on:click="clearTodos">
      Clear
    </button>
  </div>
</template>

<script>
export default {
  data: function () {
    return { newTodoText: '' }
  },
  methods: {
    createTodo () {
      this.$store.dispatch('addTodo', {text: this.newTodoText})
      this.newTodoText = ''
    },
    clearTodos () {
      this.$store.dispatch('clearTodos')
    }
  }
}
</script>
No changes to the template. We updated the createTodo method here to dispatch the createTodo action of our store. Note that we can pass a new Todo object as a second argument to dispatch. clearTodos functions in a similar manner. This is interesting because you can see that not all state is kept in the store. The newTodoText variable doesn’t need to be saved for later, so we keep that in the data section of the component and the store never even worries about it.
4. Check out our Work!
And that’s it! After a quick npm run dev, you should be able to see your todo list with preloaded two items. Try typing a new todo and hitting enter. The todo list updates! Try clearing everything. Everything works great!


A few common errors. If you see an error that says something like no such method as dispatch, it means you probably created your store like this: const store = {} as opposed to const store = new Vuex.Store({}). Again, if it says could not get /, you have probably angered the ESLint gods. Check your terminal and put a darn space before those function parens.
Like before, I’m pretty much writing this as I learn the things, so if I do something wrong or you’ve got a better way, let me know about it. Stay tuned for Part 3!
Author: Ryan Palo | Tags: vue django es6 tutorial |Like my stuff? Have questions or feedback for me? Want to mentor me or get my help with something? Get in touch! To stay updated, subscribe via RSS