LTC4 - Falling in Love with Vectors
2667 words. Time to Read: About 26 minutes.This is part of a series. If you missed them, I suggest reading Lesson 1, Lesson 2, and Lesson 3.
In Lesson 4, I’m going to begin shifting focus away from solely learning how to program and start moving towards applying our new knowledge to things like physics, simulation, and more complex animations. This time, we have a few goals. I want to review using JavaScript objects and add onto what we learned at the end of the last lesson. This will include adding methods to our objects. I also want to begin to introduce a teeny tiny bit of physics and how that can help us make some great animations. One piece of the P5 library that makes that way easier is the built-in Vector object, so we’ll learn about those as well. But I know what you’re really here for. Let’s see what we’re making this time.

That’s right! We’re going to make a falling ball. A realistically falling ball. And when we click our mouse, gravity will reverse itself. Is it just me, or is it getting EXCITING in here?? Here’s our formal requirements.
Our sketch must contain a ball that moves under the influence of gravity, using a simulation of acceleration, velocity, and position to produce an authentic effect. When the ball reaches the edge of the screen, it will stop. On mouse click, gravity will reverse itself.
You know the drill. Let’s pick a simpler version and get started.
Step 1. A Falling Ball
For this first step, let’s ignore the stopping at the edge of the screen and the switching direction. All we want is for the ball to fall. I am going to phase out reviewing the stuff from the first couple of lessons, so if you missed those, I recommend you go back and check them out. Grab your trusty index.html and start up a new sketch.js.
function setup() {
  createCanvas(600, 600);
  background(255);
  stroke(0);
  fill(0);

  // Stuff to setup our ball will go here
}

function draw() {
  background(255);  // Clear the page before redrawing

  // Stuff to animate our ball will go here
}
All of this should look very overwhelmingly familiar by this point. Let’s get to the good stuff. We know that we’re going to need a ball, but first, let me introduce the Vector, which will lead us to the software version, the P5 Vector, for which I’ve given you a link to the documentation. Check it out if you’re the over-achiever kind. This next section goes a little more in-depth about vectors. It’s mostly for background, but it’s also because I love vectors and can’t help myself. If you’re like my wife and don’t give a rat’s patootie about the math behind things, the TLDR is that vectors are a slick way of keeping track of an X and a Y value (and sometime even a Z value) in one place, with some nice helper functions along the way. Feel free to skip the next section if your heart is not currently burning with the fire of curiosity.
Vectors
Vectors are a mathmatical concept. At their very base, they are just a value that has a magnitude (size, length) and a direction. Now, that’s the definition people always give, and it is not a helpful one. Let me explain a little better. You can think of a vector as just a regular number with a bit of additional information. For example, let’s say you’re in a car. You’re driving along at 10 mph. Why so slow? Because you’re cautious — I don’t know. It’s your car. Drive how you want. Anyways, knowing your speed is good. Speed is a plain old number (also referred to as a Scalar). But, it would also be good to know which way your car is going! Are you driving 10 mph to the north? South? Vertically straight up because — surprise — it’s a space ship? These would all yield very different results, and you can see that the directional information can’t be stored in just a plain number. This is where Vectors come in.
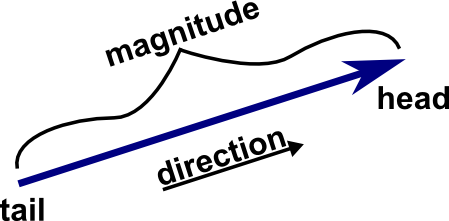
A vector is really just an arrow. It knows how long it is and which way it’s pointing. There are a lot of ways to write vectors. One way is simply <magnitude> <angle>. As in, a location: you are 5 feet from me, 15 degrees North from East. But before we get too bogged down in that mess, there’s an easier way. Let’s talk about math.
Vector Math
You can add vectors together! This next section may freak you out. Stay calm, try to focus on one piece at a time, and we’ll get through it. One nice thing about vectors is that as long as you keep them the same length and direction, you can move them around (on paper or in your mind) however you want.
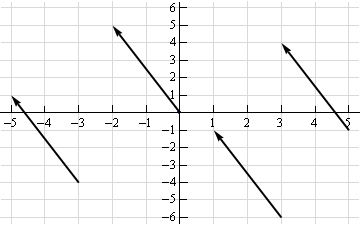
These are all the same vector! If you’re still not convinced, give me a second and I’ll give a better explanation once we’ve covered this adding business. So! Assuming you can move vectors as long as you keep the length and direction the same, then imagine you have two different vectors: A and B. In order to add them, you can move the tail of the second one to the tip of the first one. The final location is the sum!
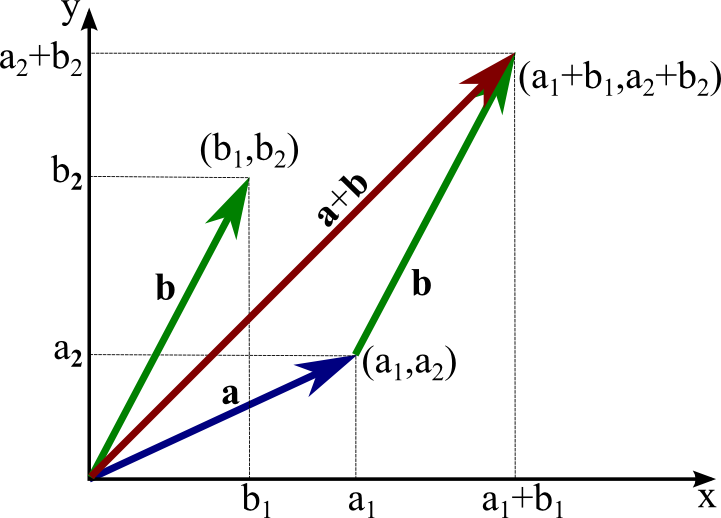
Being able to do this actually leads to a really nice way to write and think about vectors. If you can add a couple of vectors together to make other vectors, imagine if we just had a big bag of vectors that were all exactly one unit long. Some of them point horizontally, and some of them point vertically.
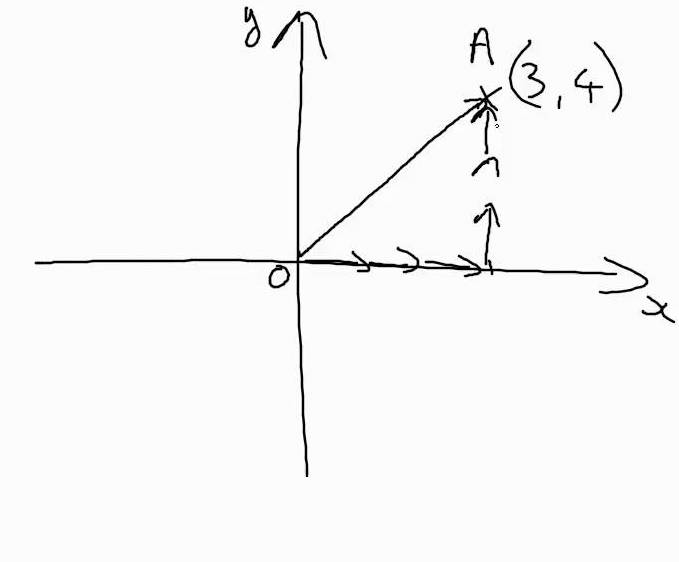
You could add many of them up to create anything you want! In physics and calculus, we often refer to the vector that is one unit long in the X direction as i. The one in the Y direction is called j. In order to make a vector from the origin (0, 0) to the point (3, 4), you will need 3 of the i vectors and 4 of the j vectors. We can write the vector from O to A as 3i + 4j. Having this handy x + y notation for vectors makes adding them even easier! Let’s say we had a vector from (0, 0) to (7, 8). We’ll call him C. We also have a vector from (0, 0) to (1, 3). We’ll call this one D. If we want to know what C + D is, we can just add up all the i’s and j’s!
C = 7i + 8j.
D = 1i + 3j.
So, C + D = 8i + 11j! No sweat!
Another name for the number next to i is the X-Component. The number next to the j is the Y-Component. For an even shorter shorthand, you can write vectors with angle brackets: <x, y>.
One more thing: you can multiply any vector by a scalar (like we talked about above, just a number). So, if C is still 7i + 8j, then 4 x C is equal to 28i + 32j. OK, that’s enough to get us through what we need to do.
Now For Some Physics
Now that you have some background on vectors, let’s talk about three (possibly new) terms: position, velocity, and acceleration.
Position is a vector, denoting where an object is in space. For our 2-D example, a simple X, Y vector will be enough here.
Velocity can be described as the change in position over time. For example, if you are at the point (3, 5) and over the next second, you move to (7, 10), then over that second, you moved 4 spaces in X and 5 spaces in Y. You could write your velocity as <4, 5>.
Acceleration is similar. It is the change in velocity over time. So you do the same math as you did for velocity, but you use velocity as the thing that is changing. If you’re going 10 mph north, and the next second you’re going 12 mph north, then your velocity increased by 2 mph over that second. Your acceleration would be 2mph north. For a more vector-y example, if your velocity is <4, 5> now, and, after one second, your velocity has increased to <6, 8>, your X velocity has increased by 2 and your Y velocity has increased by 3. So, you could write your acceleration as <2, 3>.
Clear as mud? Here are some equations that might help. They’ll definitely help in our code.
final_velocity = initial_velocity + acceleration*time
final_position = initial_position + velocity*time.
If you use the combination of position, velocity, and acceleration in your animations/simulations, they will come out looking very realistic, because the math that they’re based on is how the world actually works!
BORING! More Code Please!
var ball;

function setup() {
  createCanvas(600, 600);
  background(255);
  stroke(0);
  fill(0);

  ball = {
    pos: createVector(width / 2, height / 2),
    vel: createVector(0, 0),
    accel: createVector(0, 0)
  };

}
We’ve set up a new object called ball. This ball has a position (the middle of the canvas), velocity (zero), and acceleration (zero), just like we went over above. We used P5’s built-in createVector function, putting in our X and Y components. You’ll see how handy this comes in later. Let’s draw our ball in the draw function.
function draw() {
  background(255);
  ellipse(ball.pos.x, ball.pos.y, 10, 10);
}
See how we can get the .x and .y components of our vectors? Here’s the new animation.
Hooray! But why isn’t it moving? Well, we’re not updating our position, velocity, and acceleration like we said we would! Let’s do that now.
var ball;

function setup() {
  createCanvas(600, 600);
  background(255);
  stroke(0);
  fill(0);

  ball = {
    pos: createVector(width / 2, height / 2),
    vel: createVector(0, 0),
    accel: createVector(0, .1)  // << Let's add some acceleration.
    							// Remember in the canvas that positive
    							// is down!
  };

}

function draw() {
  background(255);
  // Remember our physics equations?
  ball.vel.add(ball.accel);
  ball.pos.add(ball.vel);
  // They're so beautiful!
  ellipse(ball.pos.x, ball.pos.y, 10, 10);
}
Every draw loop, we’re updating our velocity by adding the acceleration to it. We then update our position by adding velocity! Run your simulation and you’ll see that all of this math has been worth it.

Let’s do one more cleanup to make our code really make sense.
var ball, gravity;  // << We're going to replace our hard-coded value!

function setup() {
  createCanvas(600, 600);
  background(255);
  stroke(0);
  fill(0);

  gravity = .1;

  ball = {
    pos: createVector(width / 2, height / 2),
    vel: createVector(0, 0),
    accel: createVector(0, gravity)  // << acceleration is gravity!
  };

}

function draw() {
  background(255);
  ball.vel.add(ball.accel);
  ball.pos.add(ball.vel);
  ellipse(ball.pos.x, ball.pos.y, 10, 10);
}
OK. That was a lot of new math/physics-y concepts, and not much new JavaScript. Take a deep breath. Get a snack. The rest of this project should seem more familiar.
Step 2: Stopping
Let’s get onto our next requirement. The ball should stop when it gets near the edge of the canvas. I think you could actually handle this one yourself. Give it a try now before reading on.
var ball, gravity;

function setup() {
  createCanvas(600, 600);
  background(255);
  stroke(0);
  fill(0);

  gravity = .1;

  ball = {
    pos: createVector(width/2, height/2),
    vel: createVector(0, 0),
    accel: createVector(0, gravity),
  };

}

function draw() {
  background(255);
  ball.vel.add(ball.accel);
  ball.pos.add(ball.vel);

  // Here's the stopping magic.
  if (ball.pos.y > height - 10) {
    ball.pos.y = height - 10;
    ball.vel.set(0, 0);
  }

  ellipse(ball.pos.x, ball.pos.y, 10, 10);
}
If the ball’s Y position is about to go off the canvas, we stop the ball and make sure it stays put. High five to you if you were able to get it done without looking at the answer! High five even if you had to peek, because you’re programming and that makes you cool!
Step 3: Switching Directions
The third step on our journey is to switch the direction of gravity when we click the mouse. I think you may be able to do this one on your own as well!
function mouseClicked() {
  gravity *= -1;
  ball.accel.y = gravity;
}

Oh no! Our ball goes zooming into space! Want to see something amusing? Click again and wait. Our ball will come crashing back to earth. Looks like we need to update our stopping code to include the upper boundary of the canvas too.
  if (ball.pos.y > height - 10) {
    ball.pos.y = height - 10;
    ball.vel.set(0, 0);
  }
  if (ball.pos.y < 10) {
    ball.pos.y = 10;
    ball.vel.set(0, 0);
  }
And with that, we have success! Here’s our final code.
var ball, gravity;

function setup() {
  createCanvas(600, 600);
  background(255);
  stroke(0);
  fill(0);

  gravity = .1;

  ball = {
    pos: createVector(width/2, height/2),
    vel: createVector(0, 0),
    accel: createVector(0, gravity),
  };

}

function draw() {
  background(255);
  ball.vel.add(ball.accel);
  ball.pos.add(ball.vel);

  // Here's the stopping magic.
  if (ball.pos.y > height - 10) {
    ball.pos.y = height - 10;
    ball.vel.set(0, 0);
  }
  if (ball.pos.y < 10) {
    ball.pos.y = 10;
    ball.vel.set(0, 0);
  }

  ellipse(ball.pos.x, ball.pos.y, 10, 10);
}

function mouseClicked() {
  gravity *= -1;
  ball.accel.y = gravity;
}
Bonus Step: Cleaning up with Object Methods
I wanted to show you one more thing that will help us clean up our code a bit and make it easier to read: object methods.
In the code above, we defined our ball object with pos, vel, accel. These are attributes, or values that you can possibly set and read using the . (dot) operator. Just essentially variables. But! You can also do the same thing with functions! Here’s an example.
var banana = {
  color: "Yellow",
  length: 6,
  greet: function() {
    console.log("HI!  I'M A BANANA!");
  }
};

banana.greet();
// HI!  I'M A BANANA!
You can access other functions and attributes of the same object with the keyword this. this is a tricky rabbithole topic all of its own. This article on Dev.to is a pretty good cut at explaining more. If you’re still confused, try searching for “JavaScript this”. It’s a topic that gives a lot of people issues, so there are lots of good attempts to explain it out there.
var banana = {
  color: "Yellow",
  length: 6,
  greet: function() {
    console.log("HI!  I'M A BANANA!");
  },
  chomp: function(amount) {
    this.length -= amount;
    this.greet();
  }
};

banana.chomp(4);
// HI!  I'M A BANANA!
banana.length;
// 2
Let’s apply this to our ball code.
var ball, gravity;

function setup() {
  createCanvas(600, 600);
  background(255);
  stroke(0);
  fill(0);

  gravity = .1;

  ball = {
    pos: createVector(width/2, height/2),
    vel: createVector(0, 0),
    accel: createVector(0, gravity),
    // Here's our new functions
    update: function() {
      this.vel.add(this.accel);
      this.pos.add(this.vel);

      if (this.pos.y > height - 10) {
        this.pos.y = height - 10;
      }
      if (this.pos.y < 10) {
        this.pos.y = 10;
      }
    },
    display: function() {
      ellipse(this.pos.x, this.pos.y, 10, 10);
    }
  };

}

function draw() {
  // See how clean our draw function becomes?
  // Most of the logic that is internal to how a ball works
  // is inside the ball object now!
  background(255);
  ball.update();
  ball.display();
}

function mouseClicked() {
  gravity *= -1;
  ball.accel.y = gravity;
}
Wrapping Up
This was a good first journey into physics, vectors, and object methods. As JavaScript has progressed, they’ve made it even easier to do these things in a readable and understandable way. Most modern browsers are to the point where they support these easier ways, too. We’ll use some of these features in the next lesson to make our lives easier.
Cover image credit: NASA
Author: Ryan Palo | Tags: p5 javascript beginner tutorial |Like my stuff? Have questions or feedback for me? Want to mentor me or get my help with something? Get in touch! To stay updated, subscribe via RSS